DMPonline.be: How do I write a Data Management Plan?
DMPonline.be is an online tool to help Ghent University researchers write an effective Data Management Plan (DMP). This tip explains how to use this tool.
What is a DMP?
A Data Management Plan is a formal document that specifies how research data will be handled both during and after a research project.
Many research funders now require a DMP as part of the grant proposal process, or after funding has been approved. Some institutions, faculties or research groups may also require their researchers to submit a DMP. However, even if no-one makes you write a DMP, it is considered good practice for any research project using or generating data.
For more information about DMP's and DMP requirements, check Ghent University's webpage on Preparing a Data Management Plan.
Writing a DMP with DMPonline.be
Users can sign into DMPonline.be with their UGent account. The tool takes them step-by-step through a number of data management questions based on a relevant DMP template. Guidance is also provided to help users interpret and answer the questions.
Templates and guidance can be associated with Ghent University as a whole, with a specific faculty (or other subgroup) or with an external research funder, representing their respective requirements. Plans created with the tool can be easily shared with collaborators and exported in various formats.
How the tool works
See this video tutorial, or find the written manual below.
The instructions and screenshots below explain the main features of the DMPonline.be tool in more detail.
1. Signing in
-
Go to https://dmponline.be and select the appropriate institution.
-
You may be directed to the institutional authentication page first, in which case you have to enter your credentials.
-
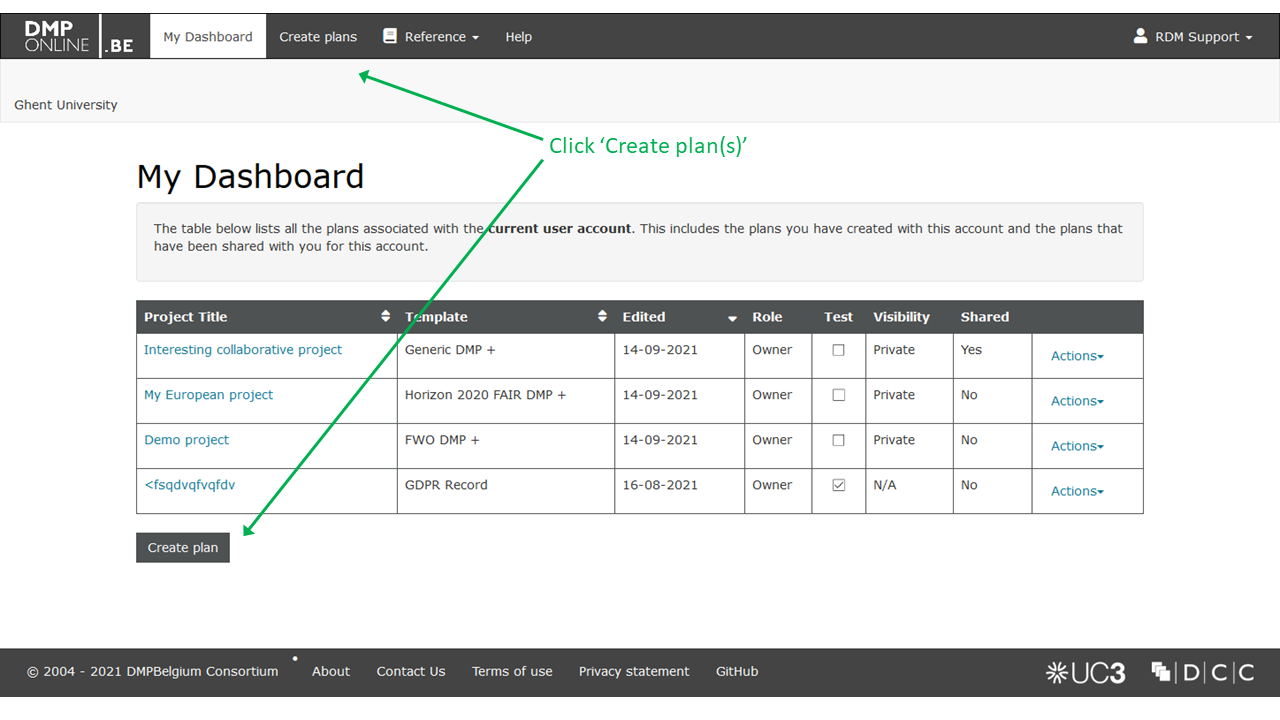
Once signed in, you are taken to the 'My Dashboard' landing page.
-
From there, you can edit, share, download, copy and/or remove any of your plans, and see plans that others have shared with you.
2. Creating a new plan
To create a new DMP, click the ‘Create plans’ button on the ‘My Dashboard’ page.
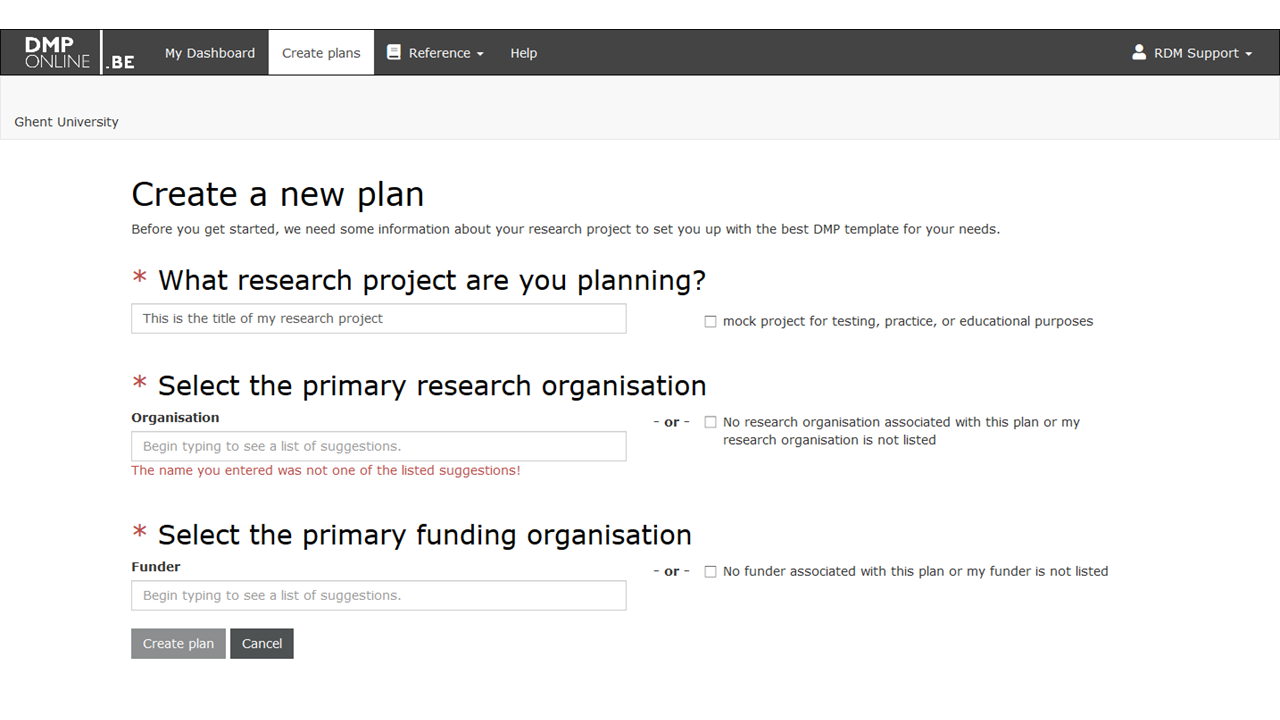
The tool will then take you to a form to determine which DMP template and guidance it needs to show you:
- Enter the title of the project for which you are creating a DMP (mandatory). If you are creating a plan for testing, practice or educational purposes, please indicate this with the checkbox. Visibility of mock projects is private by default.
- Select your organisation (institution), so that you can choose a template and see guidance from your organisation. The institution you used to log in will be selected as default.
- When applicable, type a few letters of a funding organisation and select a funder from the dropdown menu if you are writing a DMP for an external research funder (e.g. ERC, FWO). If you are not writing a plan for an external funder, or if your external funder is not (yet) listed, simply check no funder associated or my funder is not listed.
- If more than one template is available, choose the one you want from the dropdown menu.
3. Editing a plan
Via the tabbed interface you can navigate through different functions.
Project details
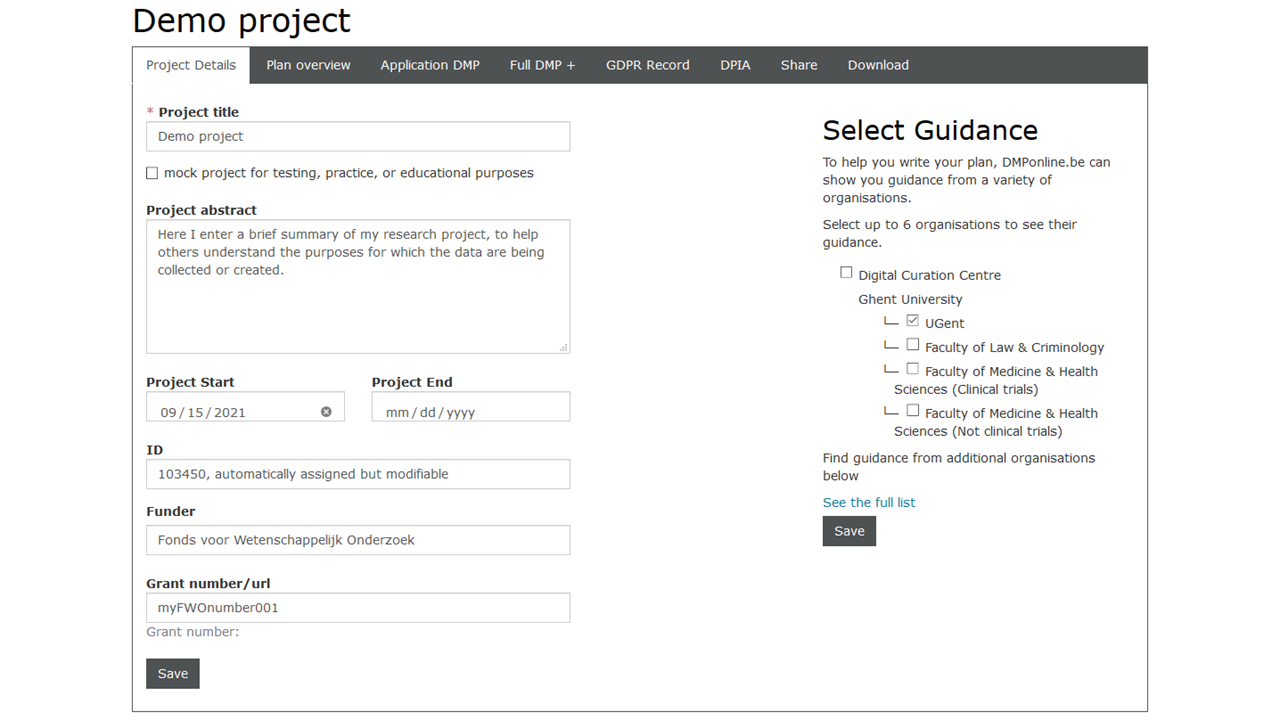
Use the Project details tab to complete the administrative details for your project, i.e. some basic information about your research project (e.g. project ID, abstract, ...).
The default guidance sources will be selected for your plan. If you wish, you can also select other sources of guidance (e.g. from a specific department if available) by ticking the corresponding box(es).
Editing
Use the DMP template tab to start editing your plan.
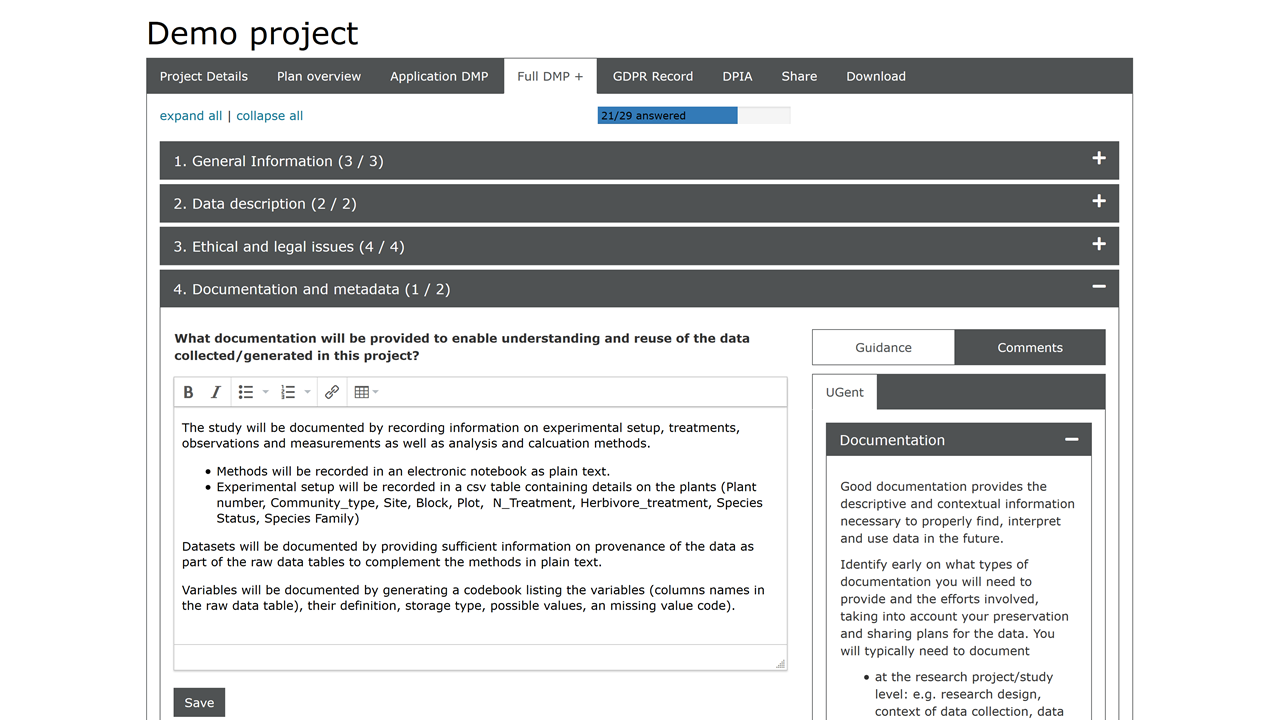
A DMP consists of several sections that each comprise one or more questions. When opening up a section, you will see the DMP question in the top left corner, and a text box below (or another answer format such as a dropdown menu, radio buttons etc.) to enter your answer.
Guidance to help you answer the question is provided on the right side (question-specific guidance is automatically opened; to see available themed guidance, click the ‘+’ sign).
Also on the right is an ‘Add comment’ tab that you can use to leave a note to yourself or a collaborator.
A progress indicator next to your project title shows how many questions you have answered. A minimum of 50% of the questions should be answered to enable you to set the plan visibility options.
GDPR record and DPIA
On the GDPR record tab, you can register the processing of personal data in your research. If you process personal data, you will be presented with a series of GDPR questions that you must answer in order to internally register your activities with regard to the processing of personal data (as required by the privacy legislation).
On the DPIA tab, you can document the Data Protection Impact Assessment in case your project involves high risk processing of personal information. If so, you are presented with a series of questions that allow you to further estimate and document the risks.
4. Sharing a plan
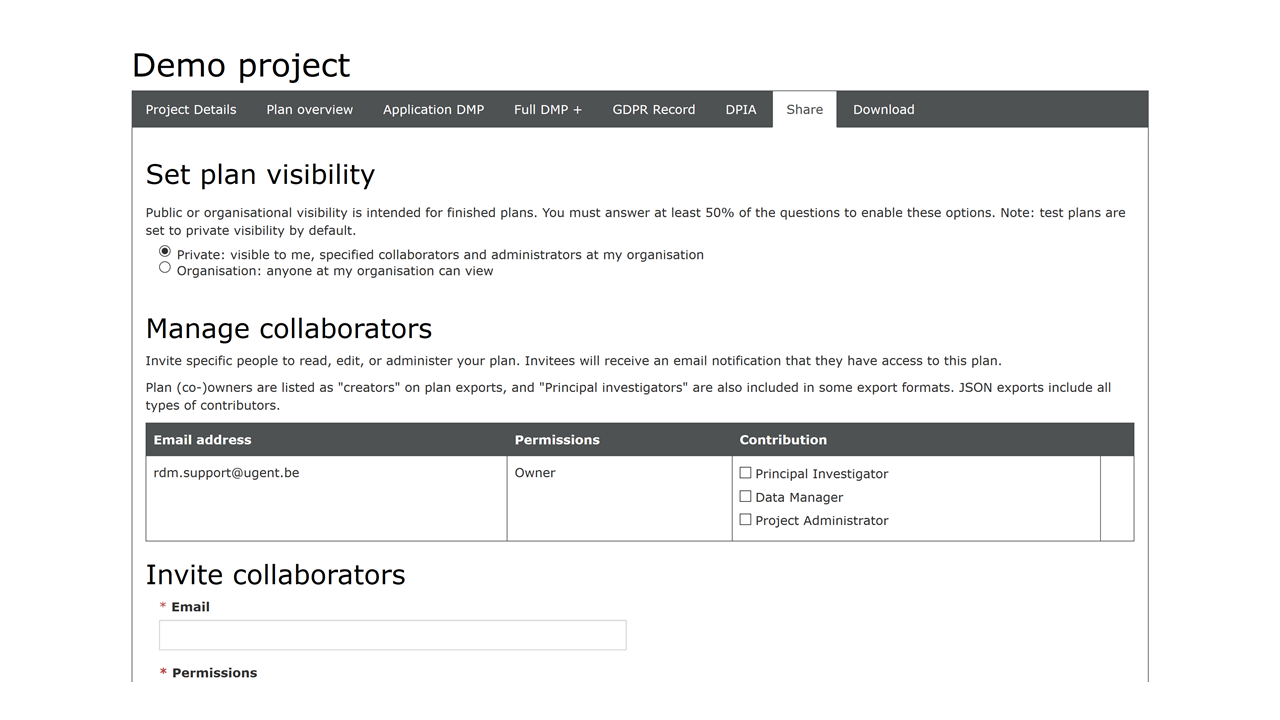
Via the ‘Share’ tab, you can give other users (such as a collaborator or supervisor) access to your plan and clarify each user's role.
It is also possible to set the visibility of your plan, when at least 50% of the questions have been answered. By default, the visibility is set to private. The visibility can be set to:
- Private: visible to me, specified collaborators and administrators at my organisation
- Organisation: anyone at my organisation can view
To actively give access to your plan, there are 3 roles/permission levels:
- Users with read only access can only read, comment on, and export the plan.
- Users with editor access can in addition contribute to the plan.
- Co-owners can also contribute to the plan, but additionally can edit the plan details and control access to the plan. All owners of the plan are mentioned as creators when you download project details of the DMP.
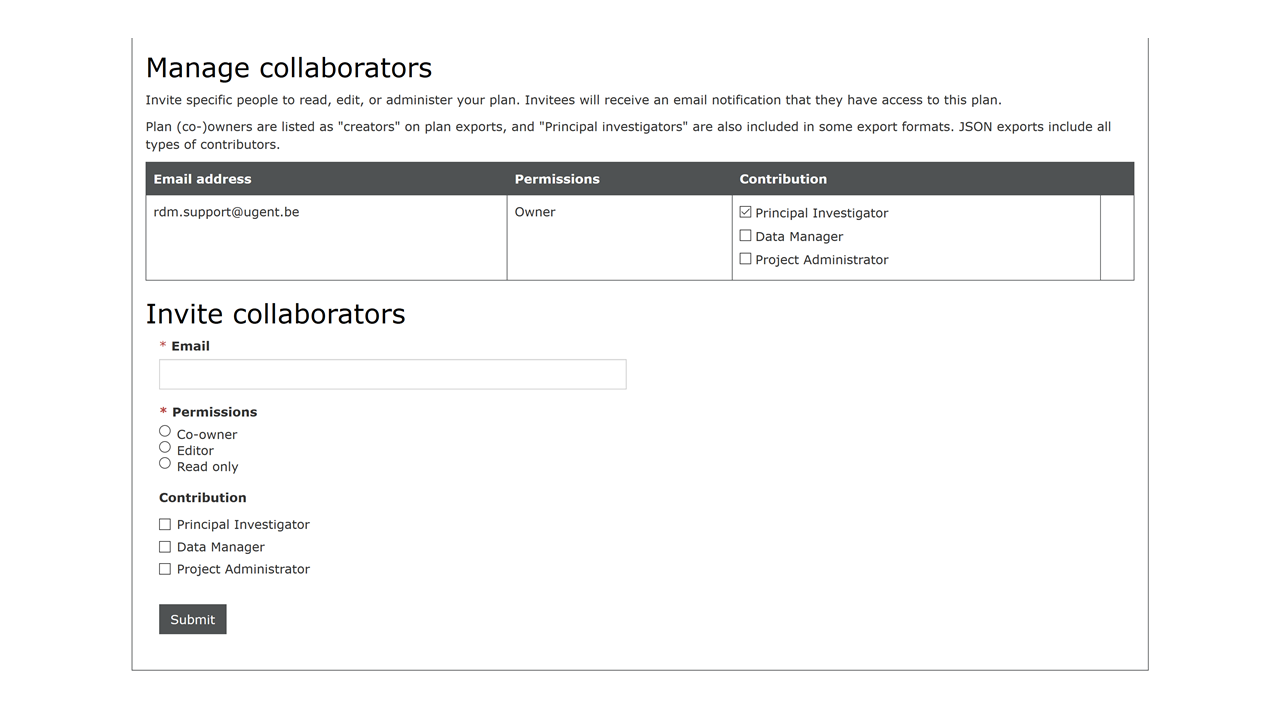
For every collaborator, you can indicate their contribution role in the project as well. The tool discriminates 4 contribution types:
- Principal Investigator: conducting the research and investigation process.
- Data Manager: actively work on data, and maintain research data for initial use and later re-use.
- Project Administrator: responsible for management and coordination of the research activity planning and execution.
- Other
To give someone else access to your plan, simply
- enter the email address which they (would) use to log in to DMPonline.be;
- choose a role/permission level (mandatory);
- indicate the contribution role in the project (if any);
- and click the Submit button.
The person in question will then receive a notification email with a link to access your plan. Make sure to check the spam folder if you do not receive the notification. Collaborators will see the plan displayed in their Dashboard next time they log in to DMPonline.be.
Note that as long as the collaborator has never used DMPonline.be, the application will not have access to their account information, and the collaborator will be displayed as 'N.N.' or 'First name Surname' in the project details on the plan export.
Note that the application administrator can view all plans in the application for support purposes.
5. Exporting a plan
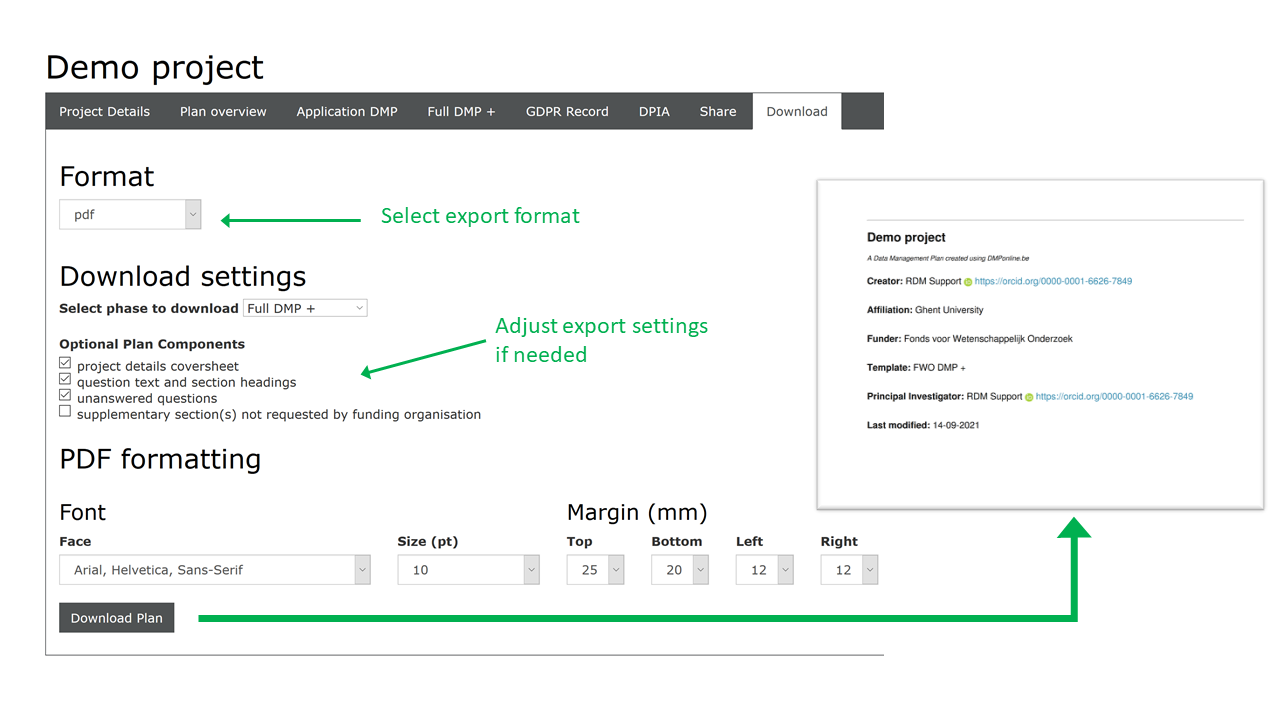
Once you have completed your plan, you can export it in a number of different formats via the ‘Download’ tab.
Simply select the format of your choice from the dropdown menu, and if needed adjust export settings (select elements such as sections or questions to include/exclude in the export document, and/or adjust fonts and margins).
When you hit the ‘Download plan’ button, the tool will export your DMP in the selected format.
6. Linking your account to your ORCID iD
On your profile page, you can link your DMPonline.be account to your ORCID iD.
To go to your profile page, click your account name in the top right corner of the application and select 'Edit profile' from the menu that appears.
On your profile page, click 'Link to ORCID' in the ORCID identifier field. This will redirect you to the ORCID website. There you can sign in to link to your ORCID iD or, if you don't have one yet, register for an ORCID account first.
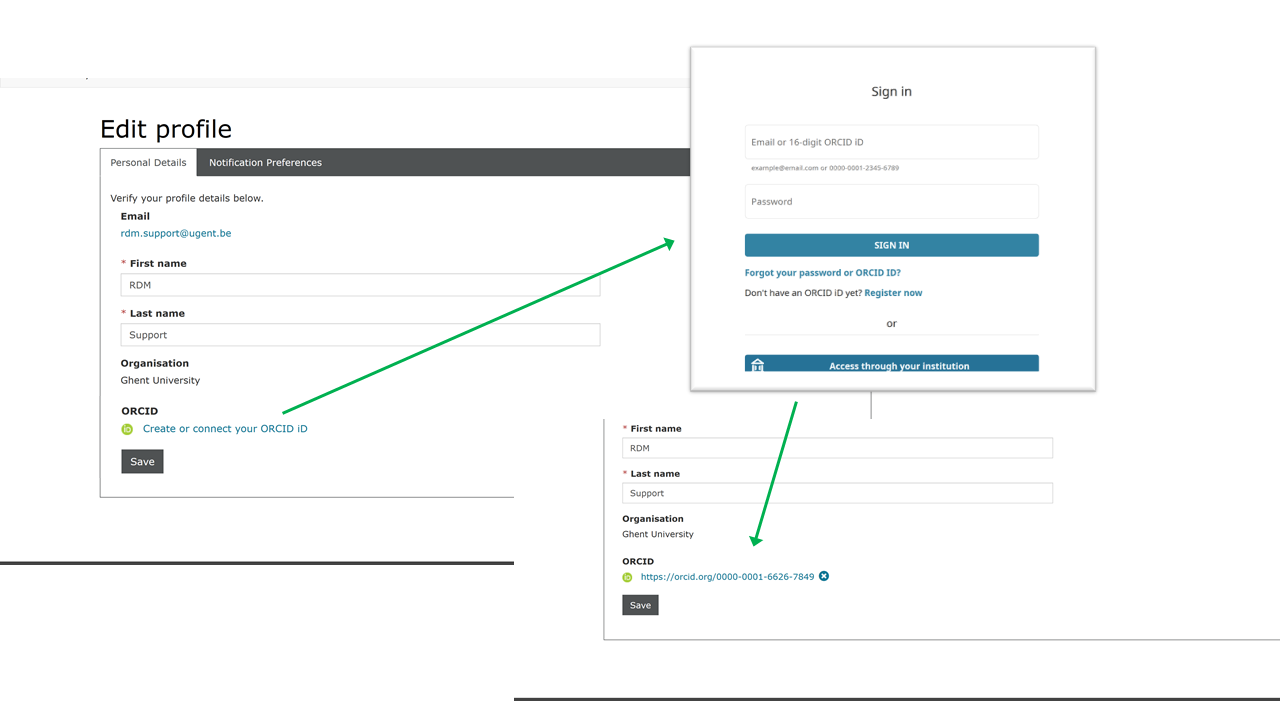
Linking your DMPonline.be account to your ORCID iD allows you to sign into the planning tool via your ORCID credentials (in addition to signing in via your UGent username and password).
It also enables you to link multiple accounts. You may have more than one account in DMPonline.be if you have more than one institutional affiliation, for example, or if your email address changes. If your different accounts are linked to your ORCID iD and you sign into DMPonline.be with ORCID, you can easily switch between accounts and select the one you wish to use.
More information
- Need more help using DMPonline.be? Have a look at the tool’s help page.
- For more information on Research Data Management and DMPs, also see Ghent University’s RDM webpages.
- For questions or feedback, send an email to rdm.support@ugent.be.
More tips
- AVG: hoe registreer ik mijn verwerkingen van persoonsgegevens? (Research integrity & ethics)
- DMP: How do I write a final Data Management Plan? (Publish)
- DMPonline.be: sign in via ORCID (Research integrity & ethics)
- EU funding: Open Research Data for ERC grants - H2020 (Funding / GISMO)
- EU funding: Open Research Data in ERC projects - H2020 (Funding / GISMO)
- FAIR: What are the FAIR data principles? (Research integrity & ethics)
- FWO: How do I complete the DMP section in my FWO application? (Research integrity & ethics)
- GDPR: how do I register personal data processing activities? (Research integrity & ethics)
- GISMO: hoe koppel ik een DMP aan mijn project? (Funding / GISMO)
- GISMO: How do I upload a DMP and link it to my project? (Funding / GISMO)
- Open Research Data Pilot and research data management for Horizon 2020 projects (Funding / GISMO)
- Open Research Data Pilot en Data management voor Horizon 2020 projecten (Funding / GISMO)
- Research Data Management: What is RDM? (Research integrity & ethics)
- The research data lifecycle: What is it? (Research integrity & ethics)
Last modified Oct. 7, 2024, 9:16 a.m.